This is a modal window.
Creating Your Portfolio Checklist
Middle School
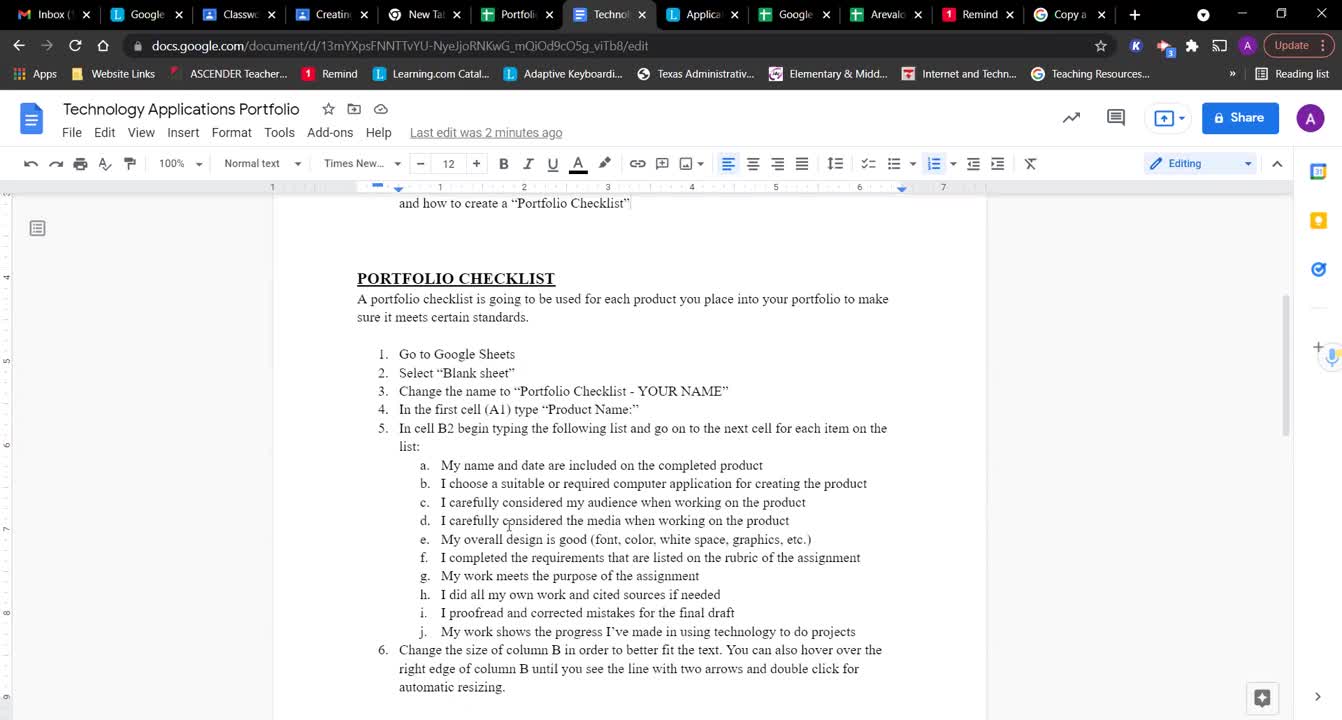
Okay, so I'm going to try to make this video short. This video is on how to create your portfolio checklist. So if you looked at the applications portfolio instructions, we are now on this last step on reading below to complete each type of portfolio and the portfolio checklist. So under portfolio checklist, I have about 9 steps listed. You're creating this portfolio checklist because you're going to use it before you put anything into the portfolio. You don't want to put something in there that's not good work because that's that portfolio is representing you and the work you're able to do. So we're going to have this checklist that is going to make sure that what you put in there is good quality work. So your checklist will look like this. You can change the font if you choose at the end to whatever you would like. The size of it, et cetera, but I'm just going to get you started on the main part of it. So that way you have it set up. And then anything you choose to change afterwards is up to you. But we are going to at least get this far. So step one go to Google sheets. So I open a new tab, you can click on your waffle. Click on sheets. Then step two says select blank sheet. So right here, once you're in sheets, just do a blank sheet. Then I know step three tells you to change the name to port folio checklist your name. So you will put your name there. Do not leave it as your name. Then I believe let's double check. Next step. Tells you in the first cell a one, we talked about this when we made the two true centralized stuff, but each of these boxes are called cells. So in this cell right here, a one, you will type product name. Then it asks you to begin typing in cell B two. So you're going to type each one of these into cell B two. Name and date are included on the completed product. And then you hit enter to go to the next one. I choose I chose excuse me. I chose a suitable or required computer application for creating the product. And you will just continue. I'm going to cheat for the sake of time on this video and copy what I've already typed. And paste it in there as well. It is going to come with no border. So once you've typed it all, it is going to look like this. Little messy, not as neat as the one that I've already created, but that's what we're here to work on in this video. So once you have typed everything in, once you've done step 5, because you have typed in all of this, step 6 is to change the size of column B in order to better fit the text. Before you move on to step 6, I would pause this video, type everything yourself first, so you can go with it with my pace of the video. Then do step 6. So change the size of column B in order to better fit the text. You should know how to change the size from the time when we messed with sheets. You can just drag it to do it, but the other thing you can do, and I put it right here, excuse me. All right. There. Is that you can just hover over the right edge. So this is the right side of column B and if you double click, it will automatically resize it to the farthest part. So if I undo and just put it back to where it was, go to the right side, and I double click. It automatically resizes it. So like I said, you can drag it yourself, just like that, or you can get it to show those two arrows and double click, whichever you prefer. So that was step 6. Then highlight cells a two down to a 11. I picked those ones because that is right next to all the stuff we typed. See? A two right here, all the way down to a 11. So if I highlight those, just like that. Then it tells you to go to insert, checkbox, because now all of those cells are highlighted and going to have a checkbox. And I did it all at once. I'm going to get rid of it real quick just to show you. You could go one cell at a time, insert checkbox insert checkbox, but that takes forever, that is why I'm telling you to highlight them all at once. Insert checkbox. So now, when you use this in the future, because you're going to put in, say, a new assignment we do next week, you will make sure and go through and check off. As many things as you did, and then you'll realize, oh, I actually didn't consider my audience or my media. Maybe I should go back and do that before I think about putting this into my portfolio. There's that. And the next step is to so that was insert the checkboxes. Now I want you to highlight all the cells that we have typed or inserted anything into. So anything that we've put something into all of these are blank. We have not put anything into any of these. So I'm just going to highlight the ones that we have. Then I'm going to go to borders, which this is our borders. If you hover over all of these tools, they pop up with what they do. If they have a dropdown arrow, it's because they do more than just that. But hover over borders, click on it, and then select all borders. If you're not sure which one it is, well, wait, and it tells you all borders. So there we go. And that is the final product. Like I said, you will use this before you put anything into your electronic portfolio in Google Drive or your physical portfolio in your binder. I just want this basic thing if you choose to go in and make the borders a different color or thicker. You completely can. Just like that. You can change the font to something else, make it bold, but then of course make sure you also resize it if you need to. Make it larger. It is totally up to you as far as that part is concerned. But like I said, make sure that you at least have the basic one that looks like this. Anything else you add extra is totally okay. But it needs to have this first before you start making anything else pretty. If you have any questions on creating the portfolio checklist, please let me know and we will move from there.


